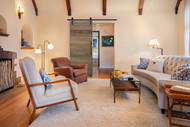
Door & Hardware Spotlight: Guadalupe Barn Door + Slade Hardware Kit
Jan 19th 2022
Whether you’re looking to add a rustic touch to otherwise modern décor or your room is already looking provincial, the Guadalupe Barn Door offers the perfect touch. It’s solid and durable with Canadian pine planks that will add a little rustic touch to any room.
Its light, natural wood finish is highlighted by a variety of front pull handles that add elegant, old-world style to any room. This barn door product spotlight explores different ways to incorporate the Guadalupe Barn Door into your home along with a brief installation tutorial.
Why the Guadalupe Barn Door?
This barn door is sturdy and built to last. It’s perfect for sectioning off closets or adding a little privacy into an open floor plan without taking up the space required for doors that open outward. Offering rustic planks reminiscent of the French countryside, this door is versatile.
We recommend mixing it with French-inspired furniture for a romantic country look or adding it to a sophisticated room for a touch of shabby chic. This door is durable and made to slide, so you can use it to mask utility rooms, section off an office from the rest of the living room, or for anywhere else you could use a sliding door.
How to Install the Guadalupe Barn Door
We recommend using the Slade Hardware Kit. Its dark finish accentuates the rustic, natural pine featured in the door. This kit is easy to install, and it glides with ease. If you’re looking for a sliding door that won’t slip off the track, this is the kit for you.
The Slade Hardware Kit offers a quiet design, so you can open and close your barn door without any squeaking or other annoying sounds. This kit comes with a pre-drilled rail, stoppers, screws, and nuts, saving you the trouble of measuring and drilling the holes yourself during installation.
1. Check for Structural Support
Make sure you have proper support for your rail before screwing it into the wall. Use a stud finder and mount your header board into the studs. Drill holes into the header board at the location of the studs. You might consider replacing existing top molding in the doorway for a better fit.
2. Measure the Door
For best results, you want your door to hang at least 1” off the ground. Measure your doorway to make sure you don’t have to cut the door. Measure the width as well, so you can properly install the door rail and to door to slide all the way across.
3. Install the Rail Track
Once you’ve installed your header board, mark the proper height and install the rail. Use a level to make sure it’s straight. Use a pencil to mark where to install the fixtures, and drill holes at these locations. Fasten the rail to the header using the instructions provided in the kit.
4. Install the Rollers
Use the instructions in the installation kit to mark your door. Drill holes in the door at the fastener locations, and add the rollers. Make sure all of your fasteners are securely tightened to keep the rollers in the track.
5. Hang the Door
Once all of your hardware and rollers have been installed, have someone help you place the door onto the slide track. Carefully place your rollers onto the track and test out the door by sliding it open and shut.
Enjoy Your New Room
Once you’ve securely installed your Guadalupe Barn Door, step back and enjoy thew new ambiance in the room. If you have any questions or need help with installation, contact us today.
