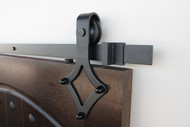
A Look at Barn Door Hardware: Royal Hardware Kit
Jun 17th 2020
Of the six hand-made BarnCraft Door Roller designs, the Royal is no doubt the most stately. Its graceful, curved diamond shape is an undeniably impactful design element.
The Royal door rollers can be used with any BarnCraft modern barn door. From the simple refinement of the Z Barn Door to the antique flair of the Double Z BarnWood Knotty Alder Two Piece Barn Door, every style receives a regal boost from this hardware.
To help you install your Royal hardware kit, we’ve summarized the steps below.
Before the InstallationOnce you’ve received your Royal hardware kit, it’s time to prepare your workspace. The materials you’ll need are
- A drop cloth
- A hammer
- A stud finder
- A tape-measure
- An electric drill
- A ratchet-socket
- #10 3” screws
- Nails
- A utility-knife
- A six-foot level
- A header board (optional, but highly recommended)
Next, open your hardware kit and lay out all components. Ensure all components are accounted for, including the instruction guide. Follow the instruction guide carefully throughout the install.
Taking MeasurementsEach install is unique, and precise measurements are vital to success. First measure the width and height of the door opening, then the width of the door casing.
Use your six-foot level to check if your floor is even. The height of the rail is based off of the lowest level of the floor. A significantly uneven floor may require a door trim.
Installing the HeaderA header board is highly recommended to ensure the stability of the install. It may be installed in place of, or above the existing top door trim. Different door dimensions are required depending on the install height of the header board.
To fasten your header board, locate the wall studs with the stud finder. Drill holes into the board that align with the studs. Then, with a friend’s help, hold the header board in place and ensure it's level. Secure to the wall using the #10 3” screws.
Installing the RailPosition the rail on the header board and drill pilot holes for the installation bolts. Then position the stand-off brackets between the rail and header board one at a time, securing as you go with the provided lag bolts.
Once the rail is fully secured, place the stoppers on each end. Tighten them down with the provided Allen wrench.
Installing the Royal RollersAs with all BarnCraft Roller designs, the distance from the bottom of the Royal roller wheel to the top of the door must be 1-7/8”.
Mark the roller bolt holes on the door, then drill where marked. Pass the bolts through both door and hardware and attach the decorative acorn nut. Tighten bolts to secure.
Once both rollers are mounted, install the anti-jump stops to the top of the door using a screw.
Hanging the DoorWith a friend’s help, lift the door onto the rail. Mark the location of the floor door guide, then secure the guide in place with the provided screw.
Finally, install the stoppers at the open and closed positions of the door. Tighten the set screws to prevent the door from rolling too far.
With that, your install is finished.
Personalizing your Royal RollersTo personalize your hardware kit before installing, any exterior grade metal paint can be used. Otherwise the Royal Rollers come in black, crafted from powder coated steel and high durometer nylon.
We’re Here to HelpIf you have any questions during your install or need help choosing just the right roller hardware for your project, we’re glad to assist. You can reach us by phone at 713.400.6626 or e-mail us at info@barndoorz.com .
